# Device Setup Instructions
# Initial Setup
WARNING
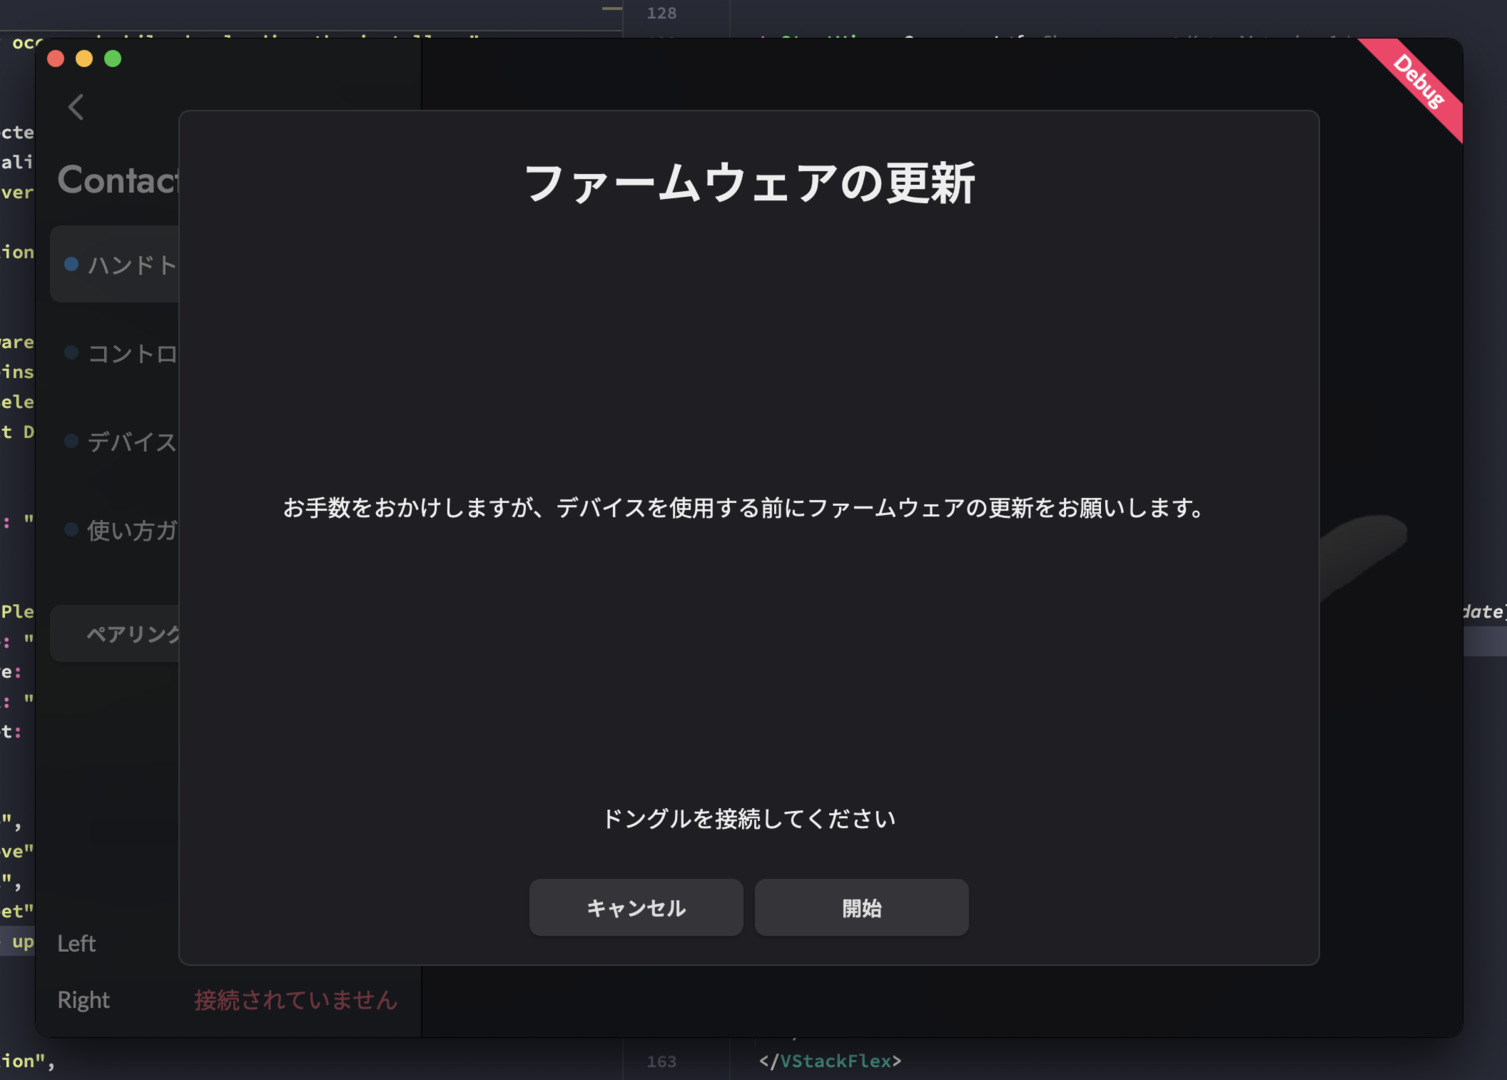
During first use, you will be prompted to install drivers and update the Firmware for the dongle and the device when launching DivingStation. Follow the on-screen instructions to complete the installation and updates.
The steps are as follows:
- Launch DivingStation and install the device drivers following the on-screen instructions.

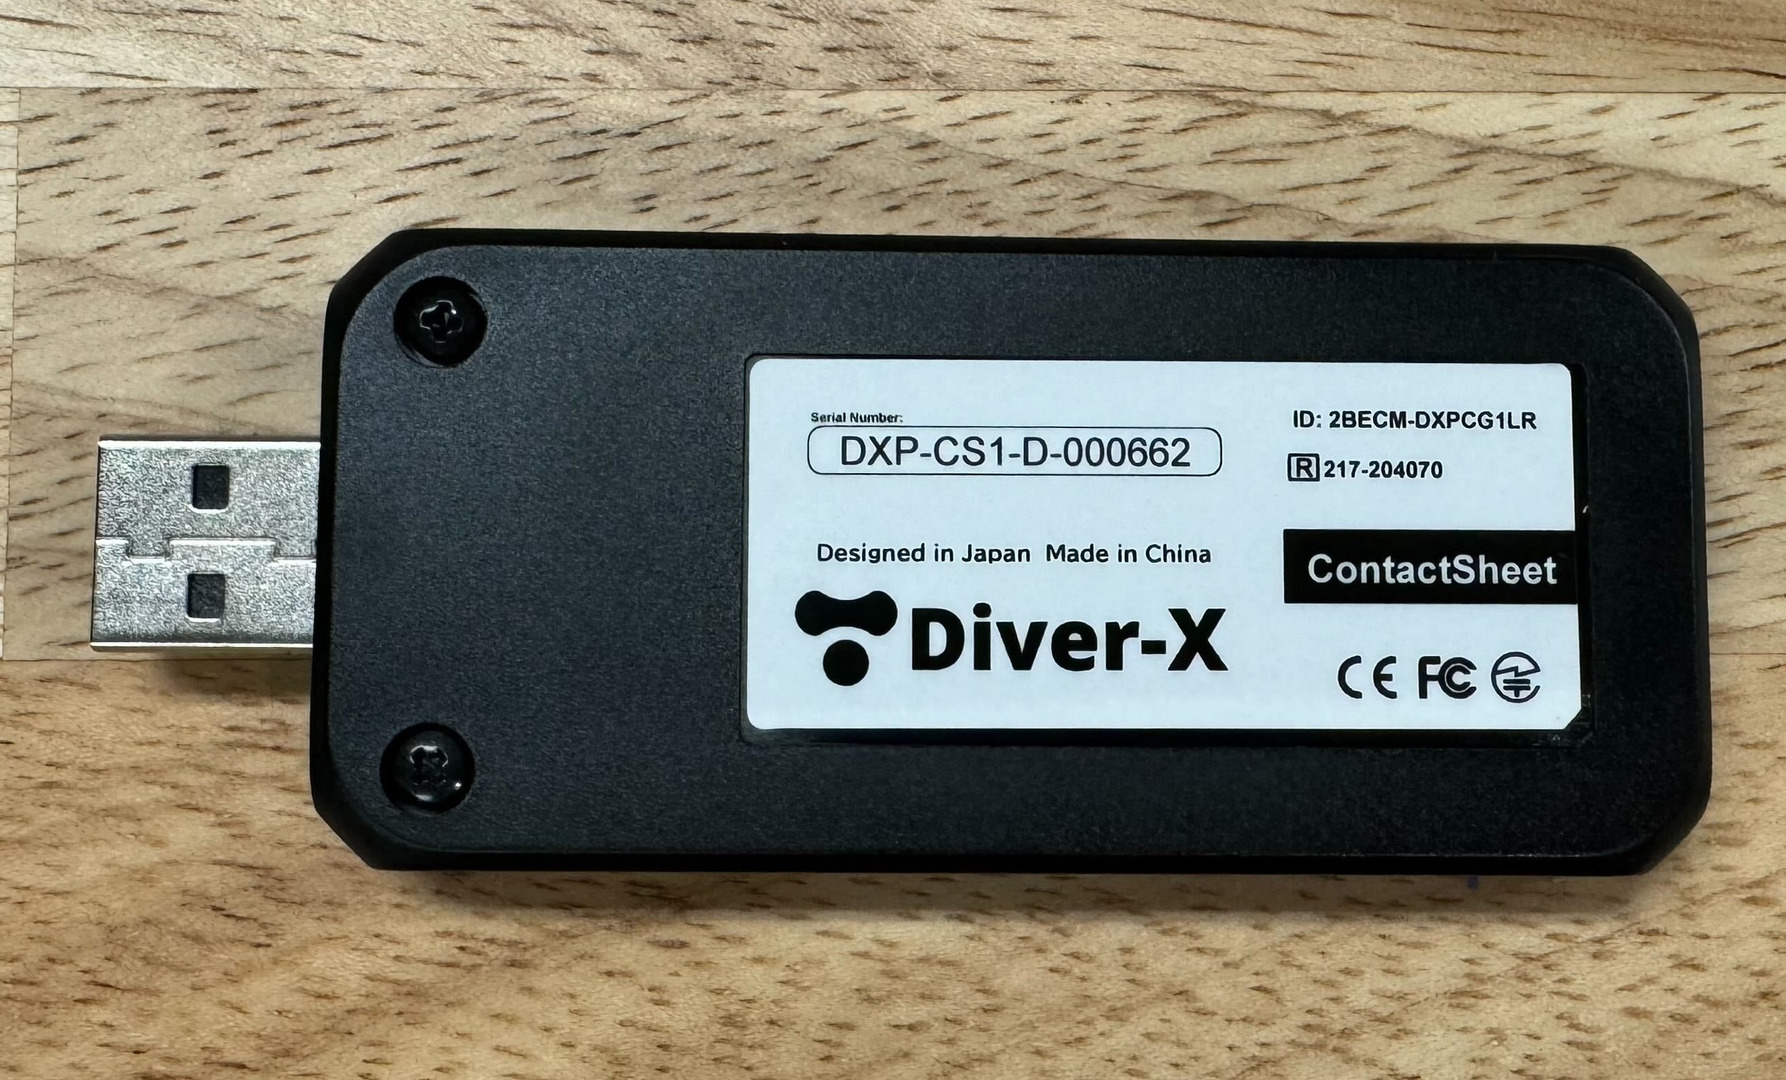
- Insert the ContactSheet dongle into the PC as instructed on the screen.

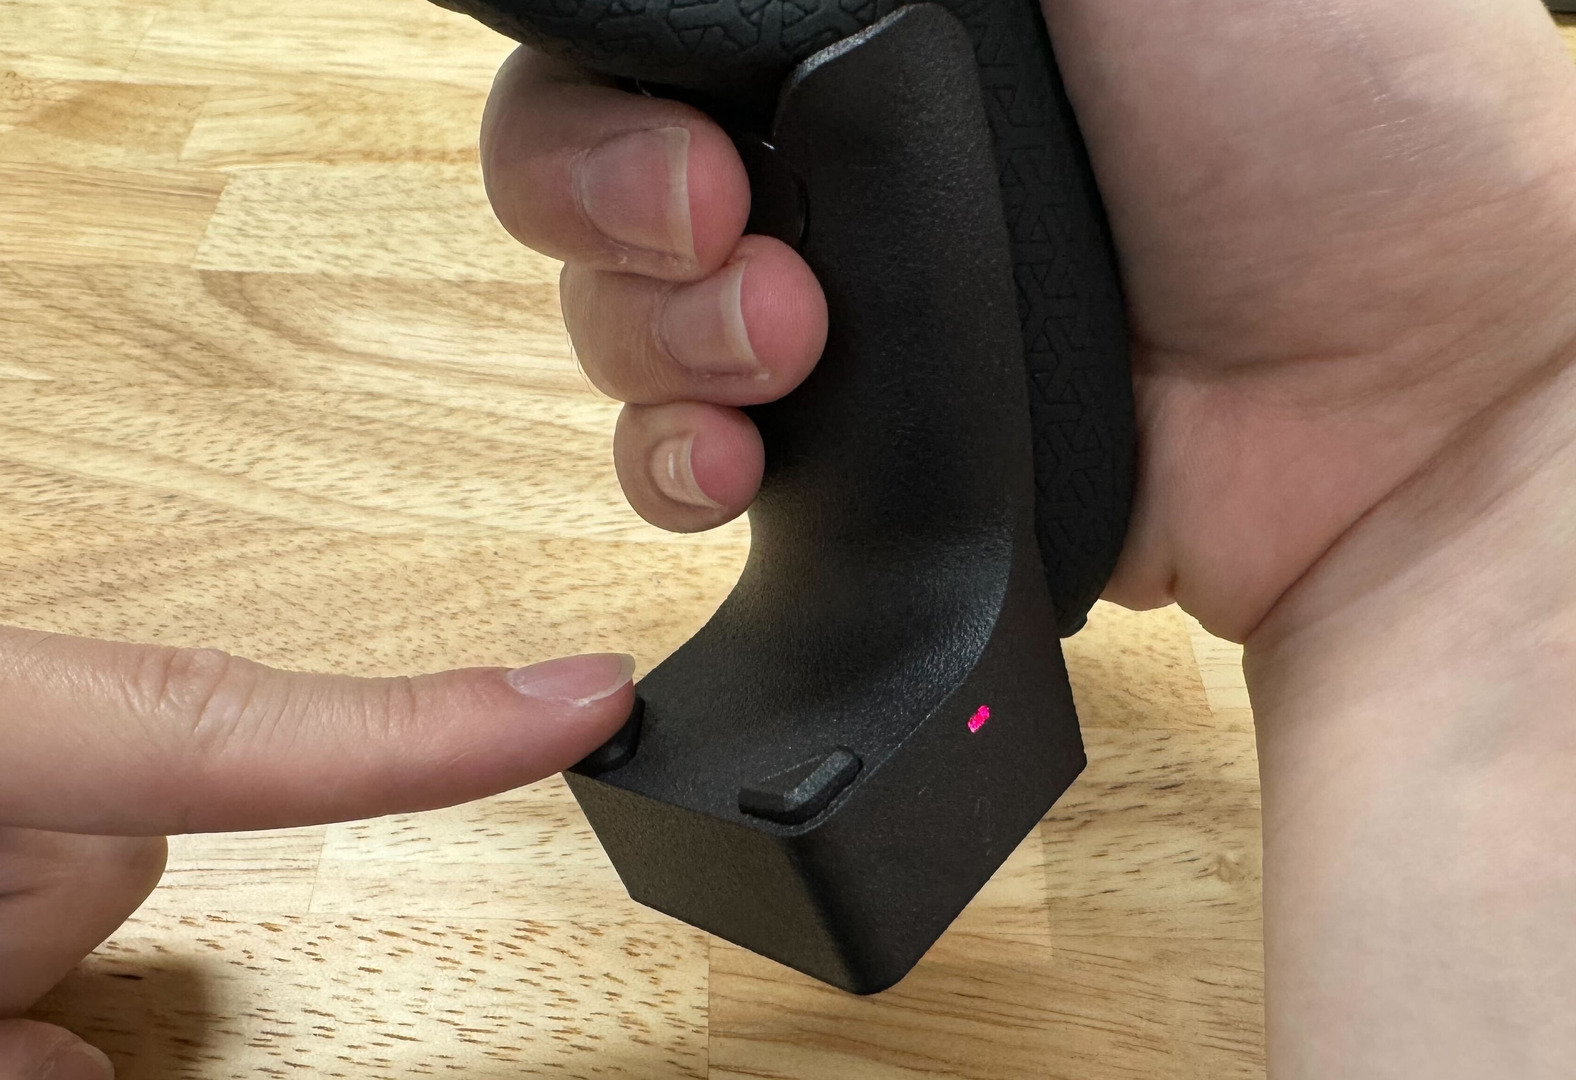
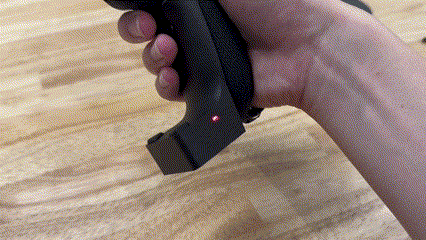
- Press and hold the power button on the ContactSheet device to turn on each power for the left and right sides.
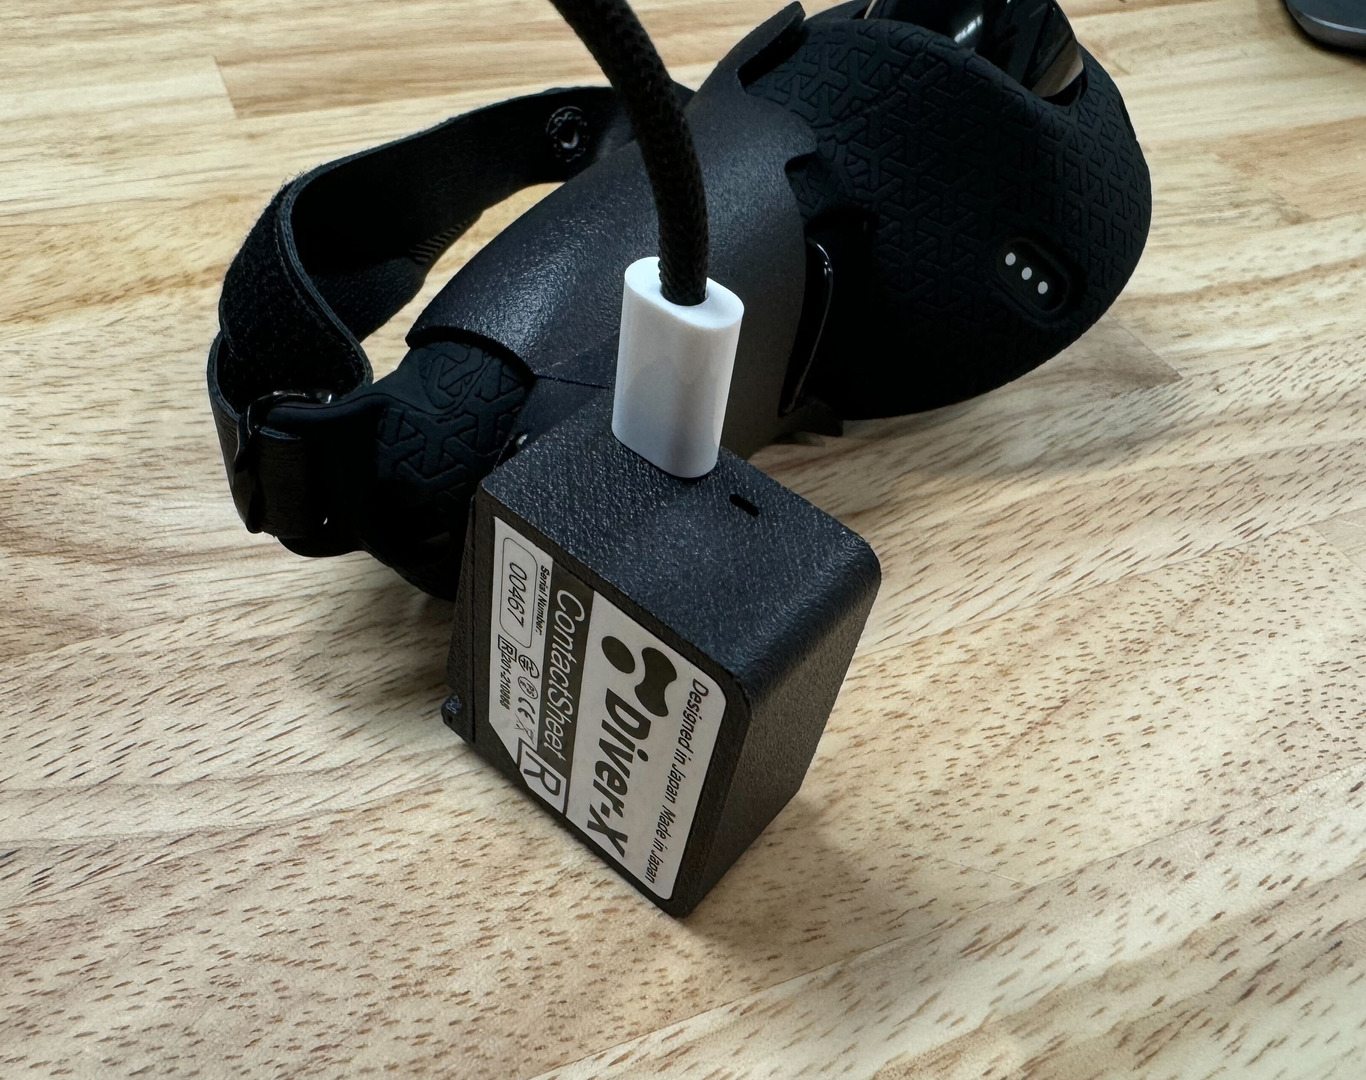
- Once the ContactSheet device is blinking red and powered on, connect it to the PC using the included USB cables.
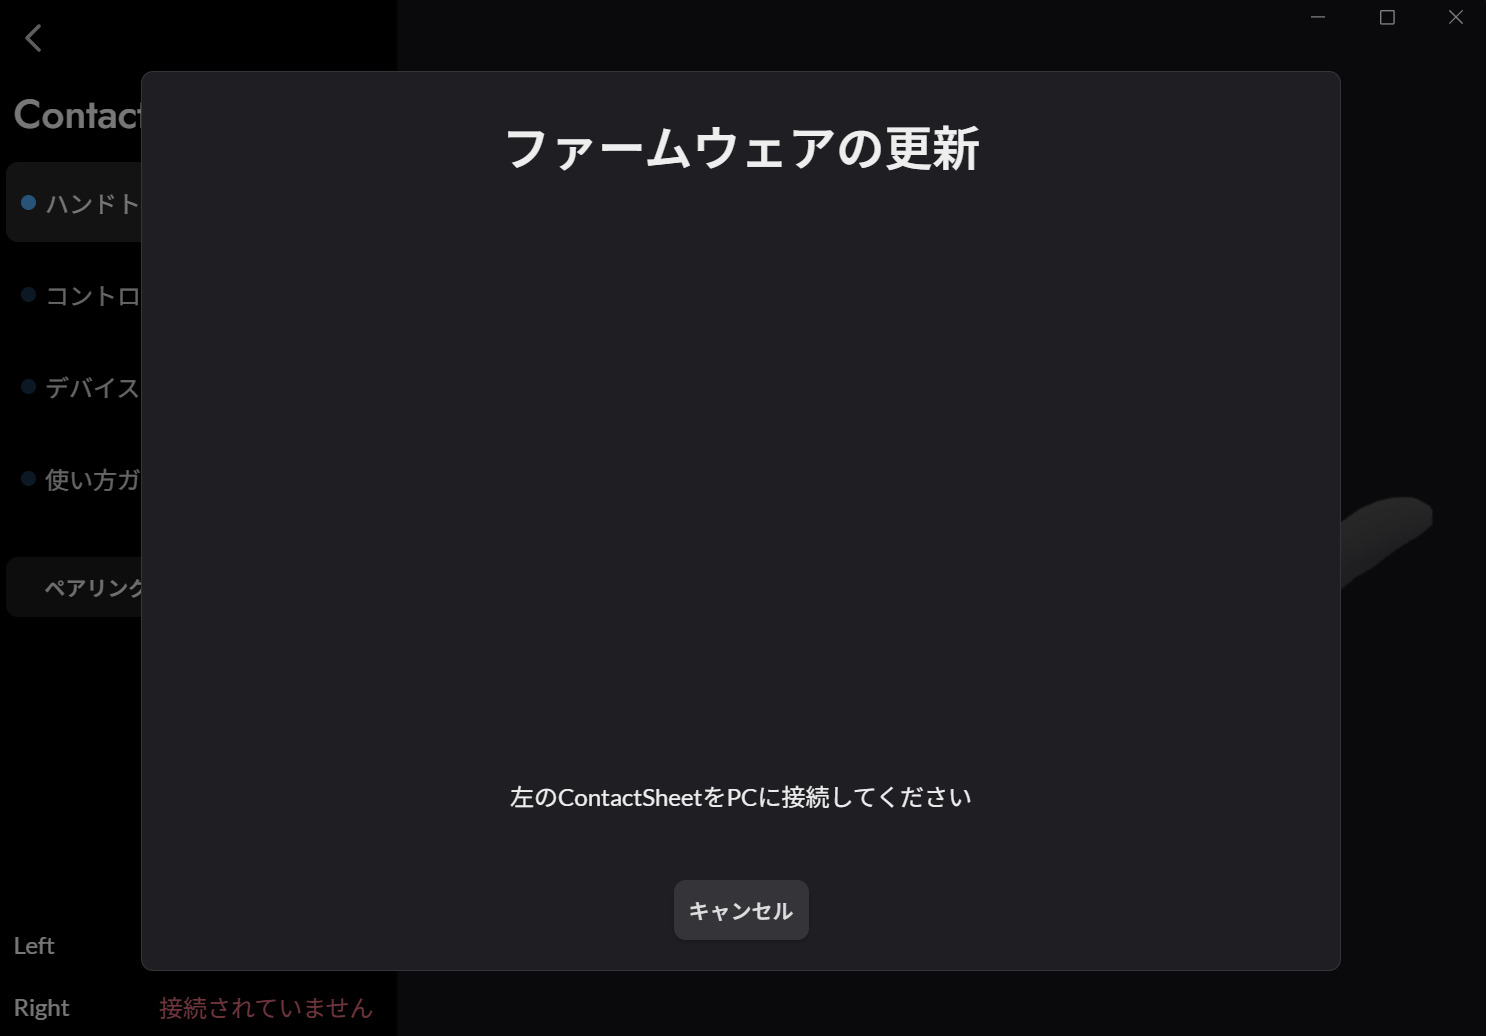
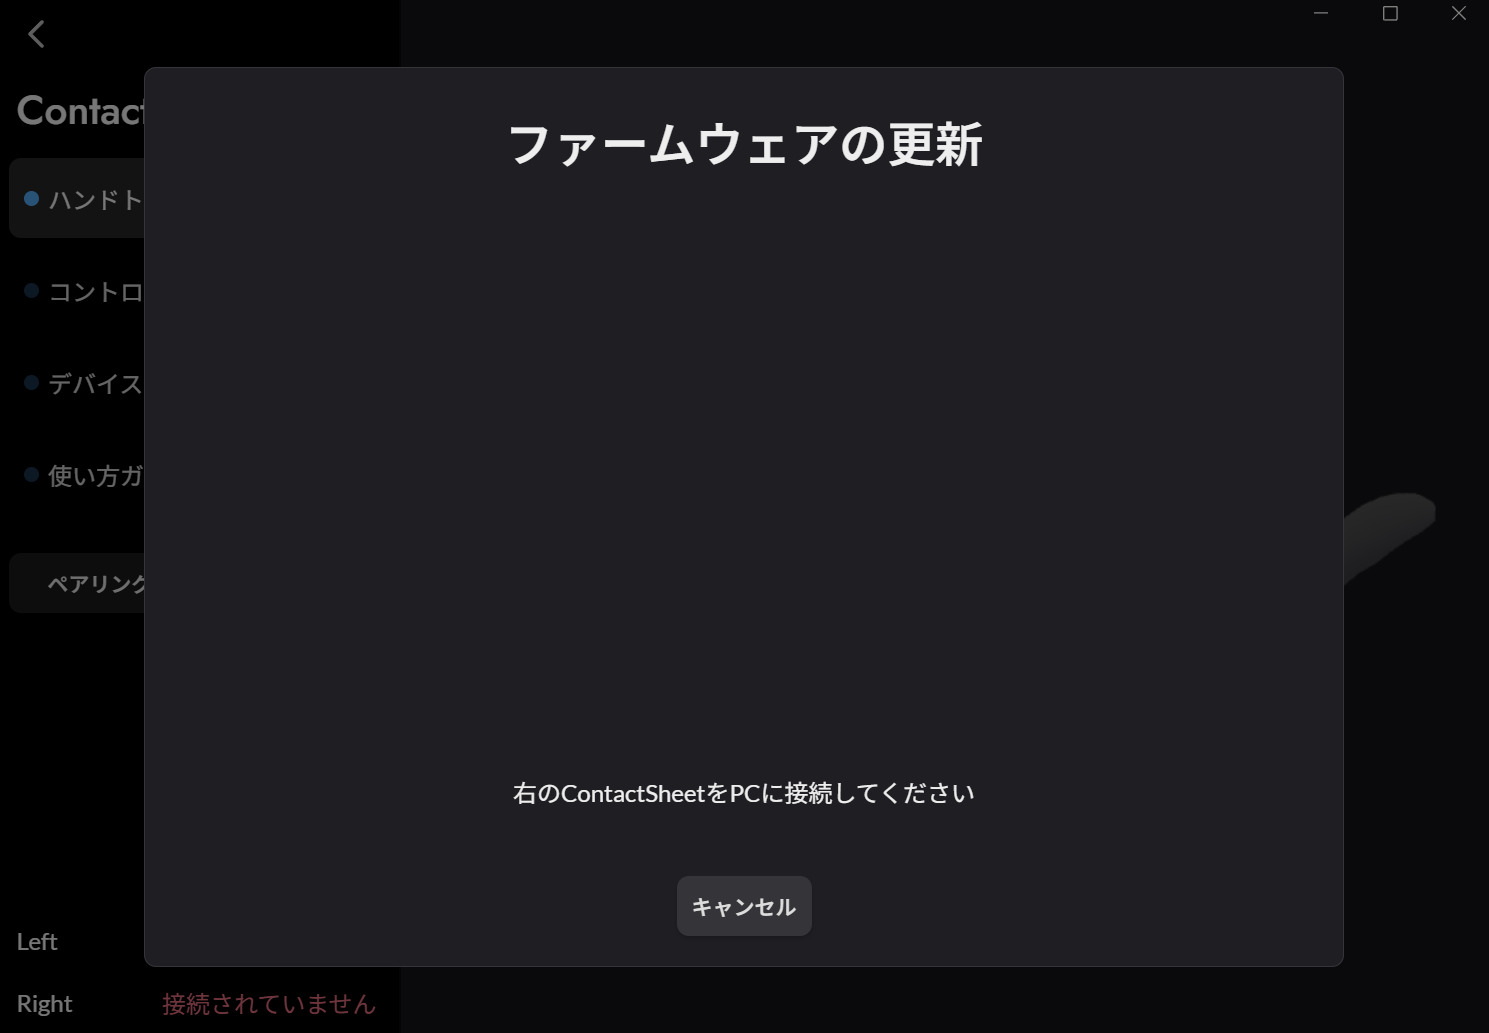
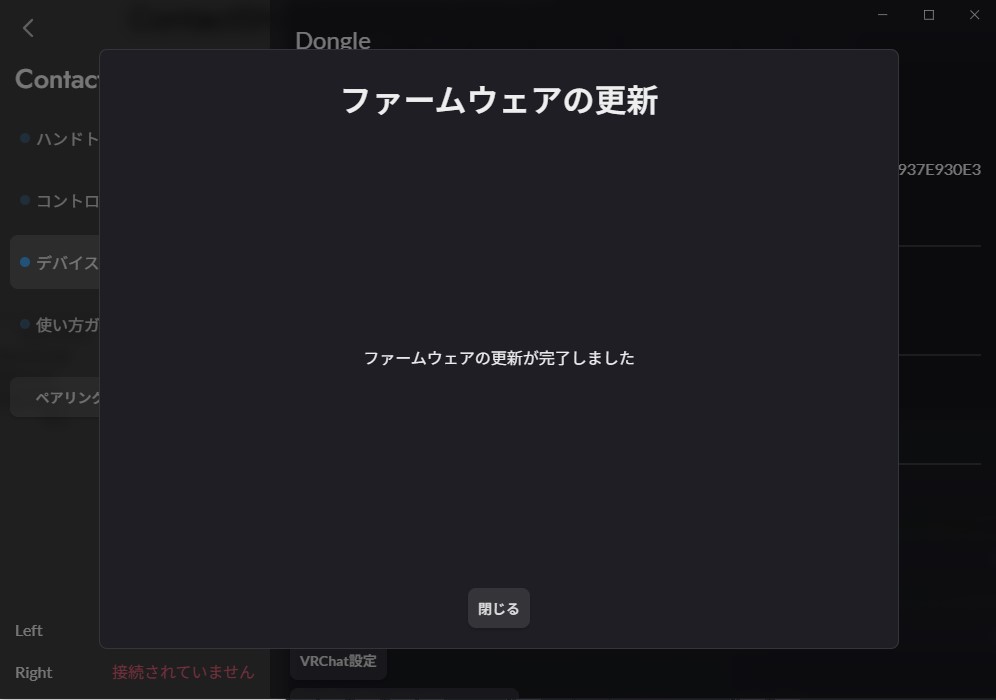
- Follow the on-screen instructions in DivingStation to update the Firmware for the ContactSheet dongle and both sides of the ContactSheet device in sequence.
- Firmware updates will begin as soon as the device is connected to the PC on each screen.
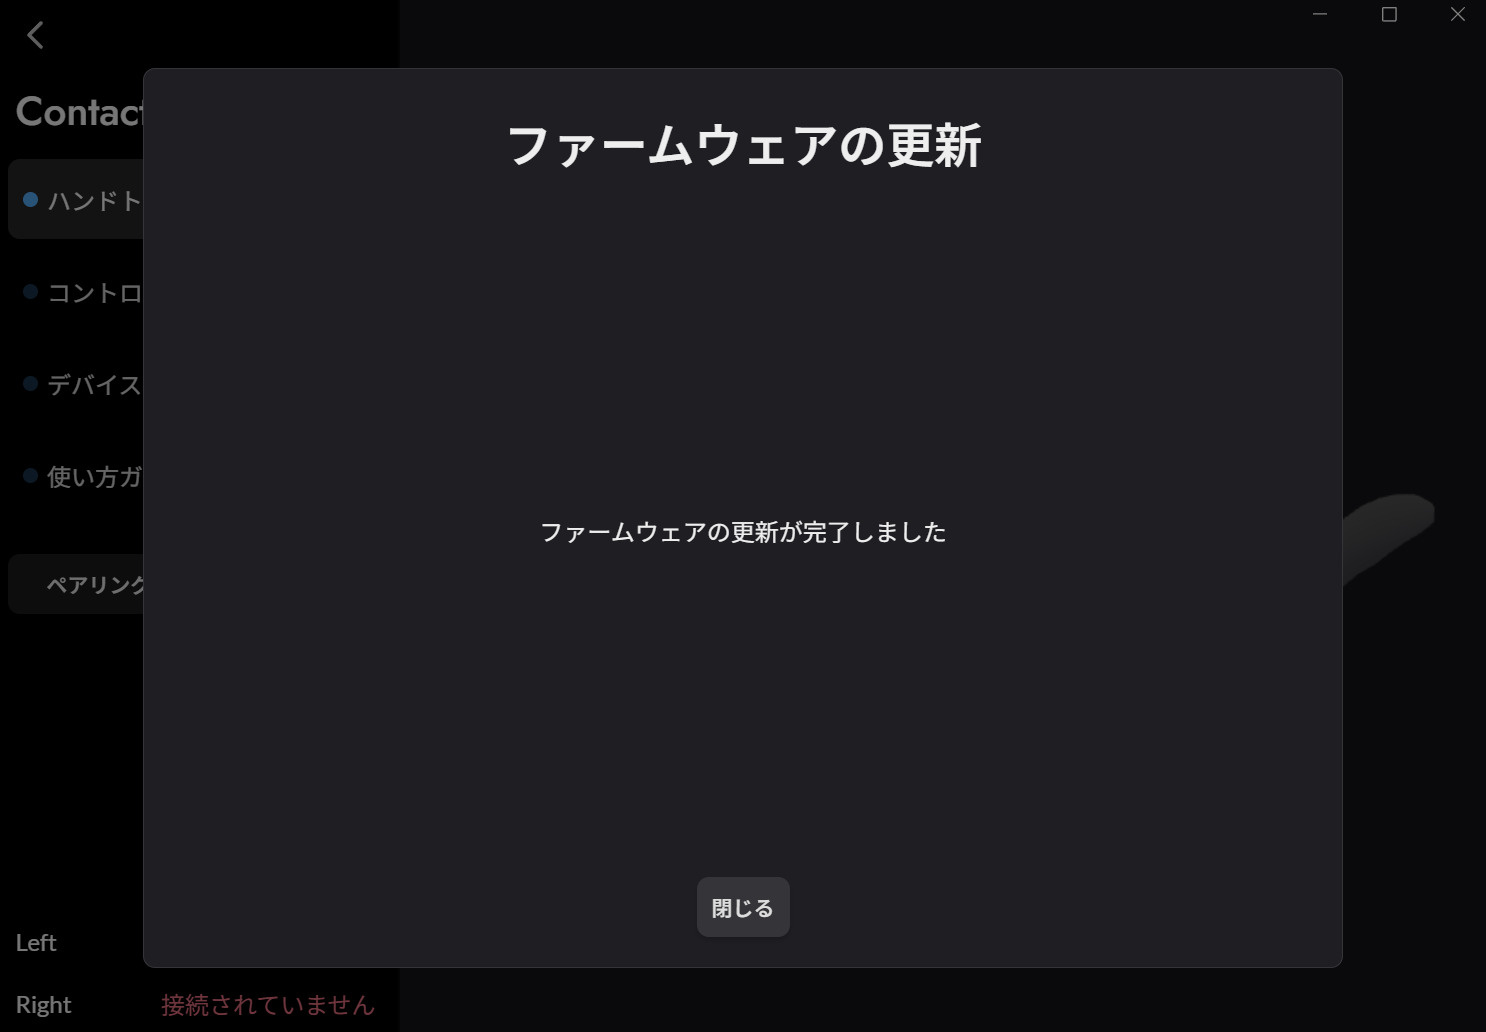
- After the Firmware update, the power for the ContactSheet device will automatically turn off.
Initial Firmware Update Screen Transitions (Firmware updates will begin as soon as the device is inserted)
[ Dongle ]
[ ContactSheet Left ]
[ ContactSheet Right ]
The Firmware update is complete!
DANGER
Do not turn off the power of the ContactSheet device or remove the dongle during the Firmware update.
If the initial Firmware update fails
If this screen appears, please manually update the device (Firmware update or reinstallation).
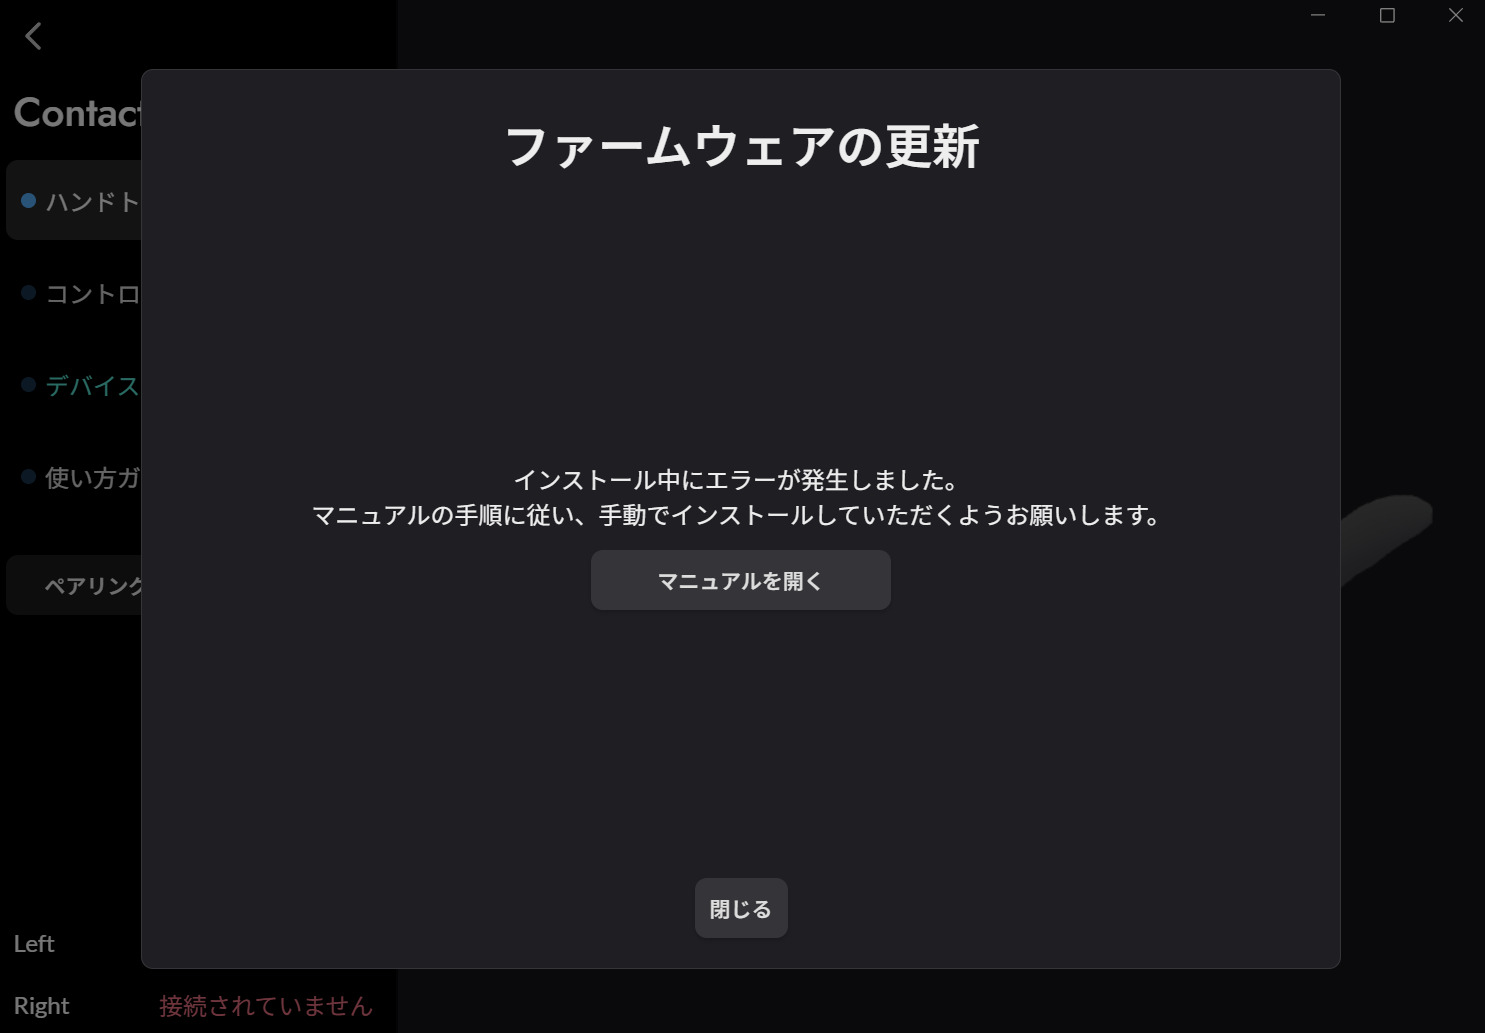
-> Firmware Manual Reinstallation Steps
Firmware Manual Reinstallation Steps
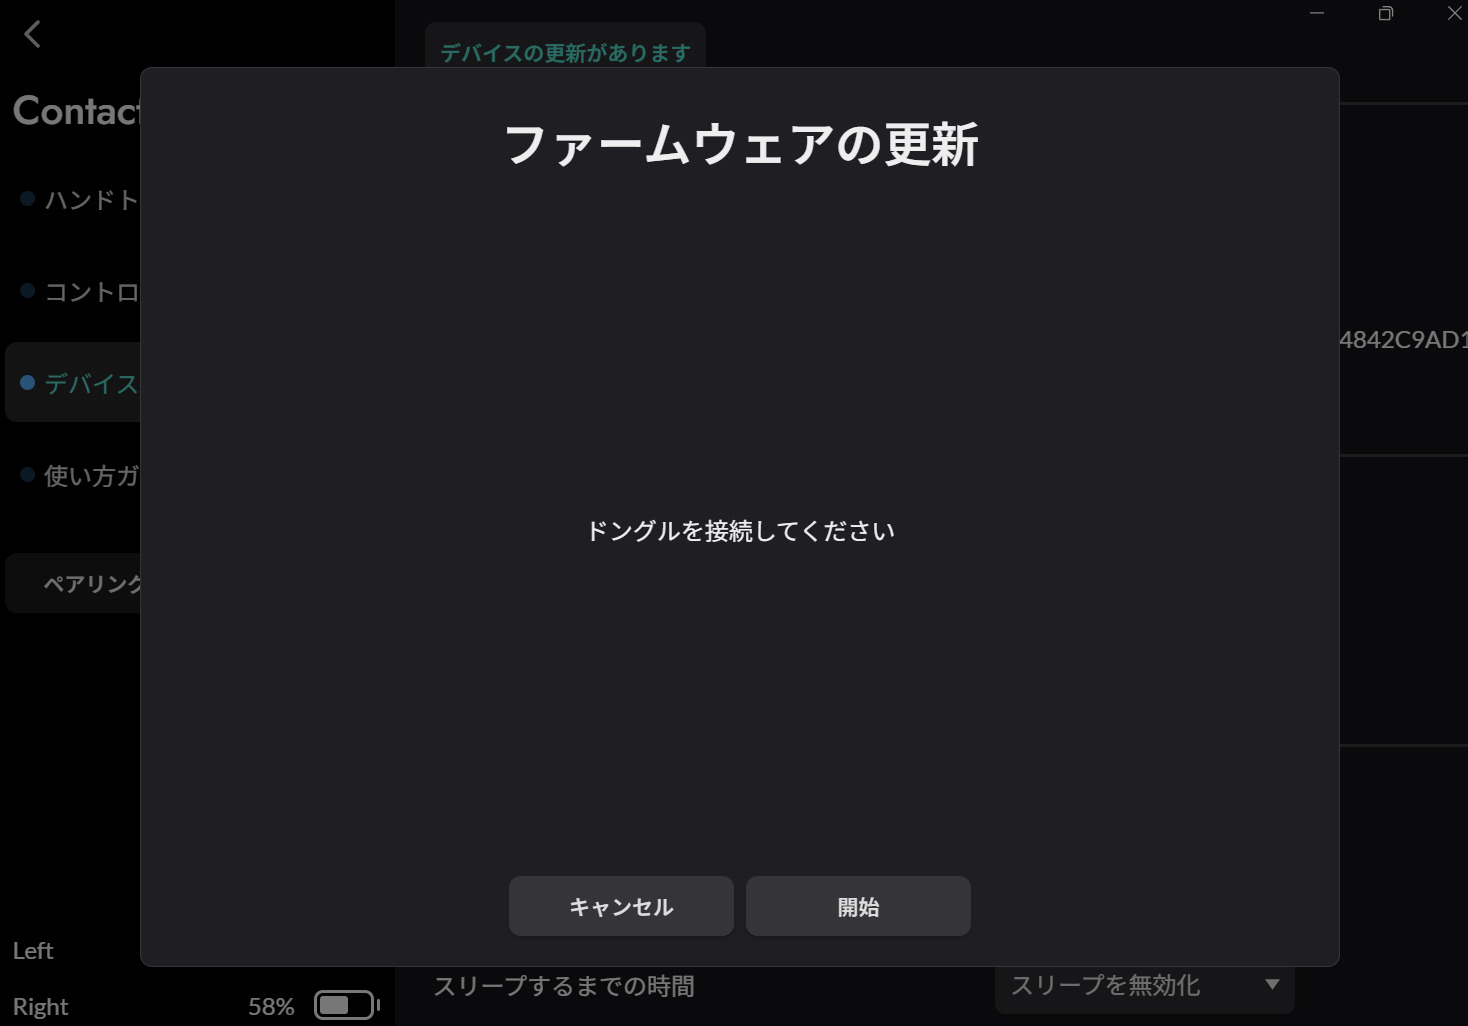
- Launch DivingStation and insert the ContactSheet dongle into the PC.
- Press and hold the power button on the ContactSheet device to turn on each power for the left and right sides.
- Once the device is powered on, connect it to the PC using the included USB cables.
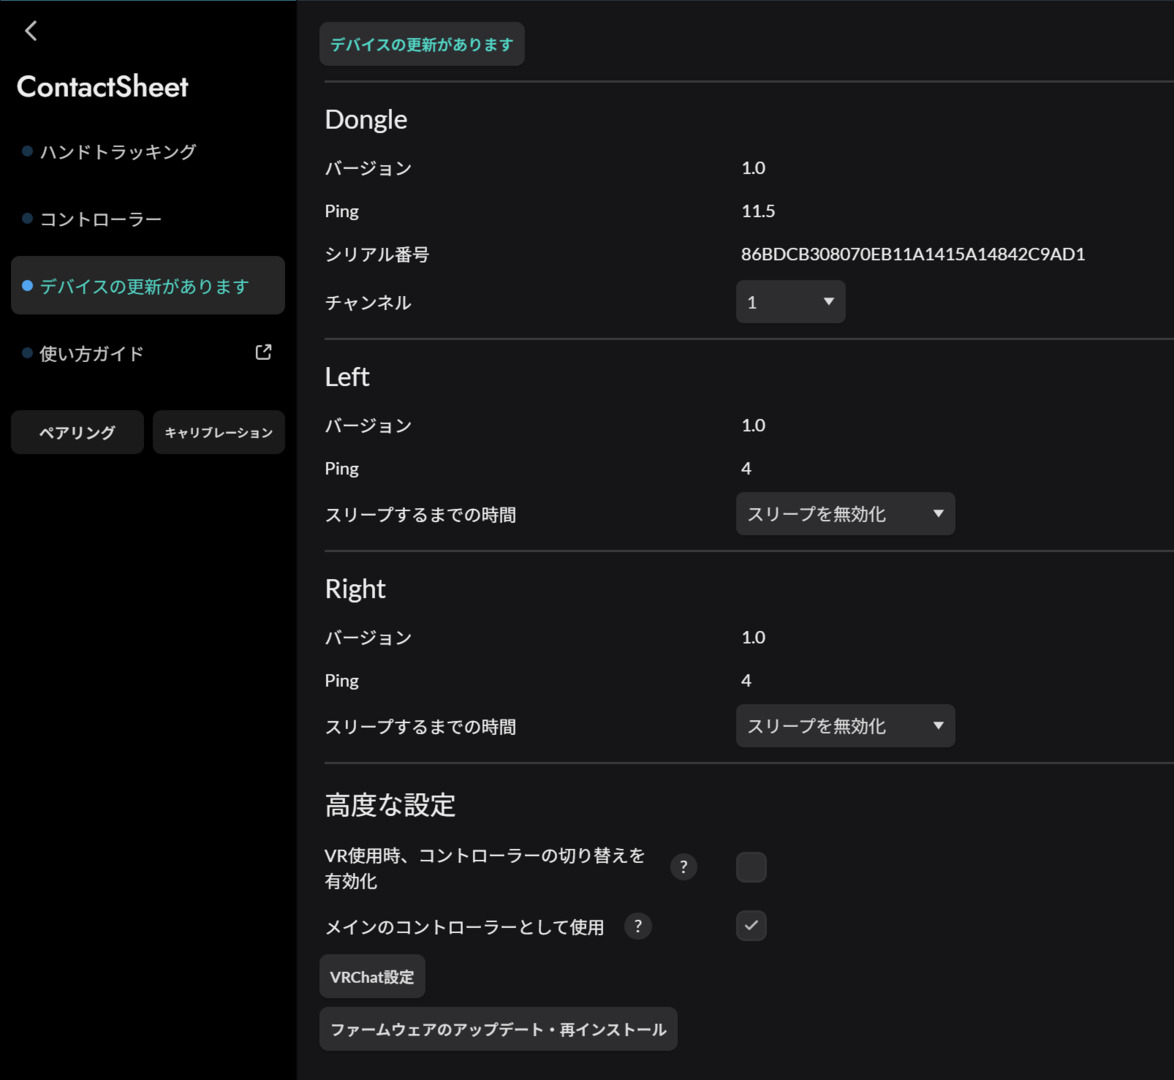
- Click on the DivingStation tab menu > Devices > Advanced Settings > Device Update (or Firmware Update/Reinstallation).
- In the Firmware Reinstallation screen, click on the Dongle at the bottom to update the Firmware.
- For Device Update
- For Firmware Update/Reinstallation
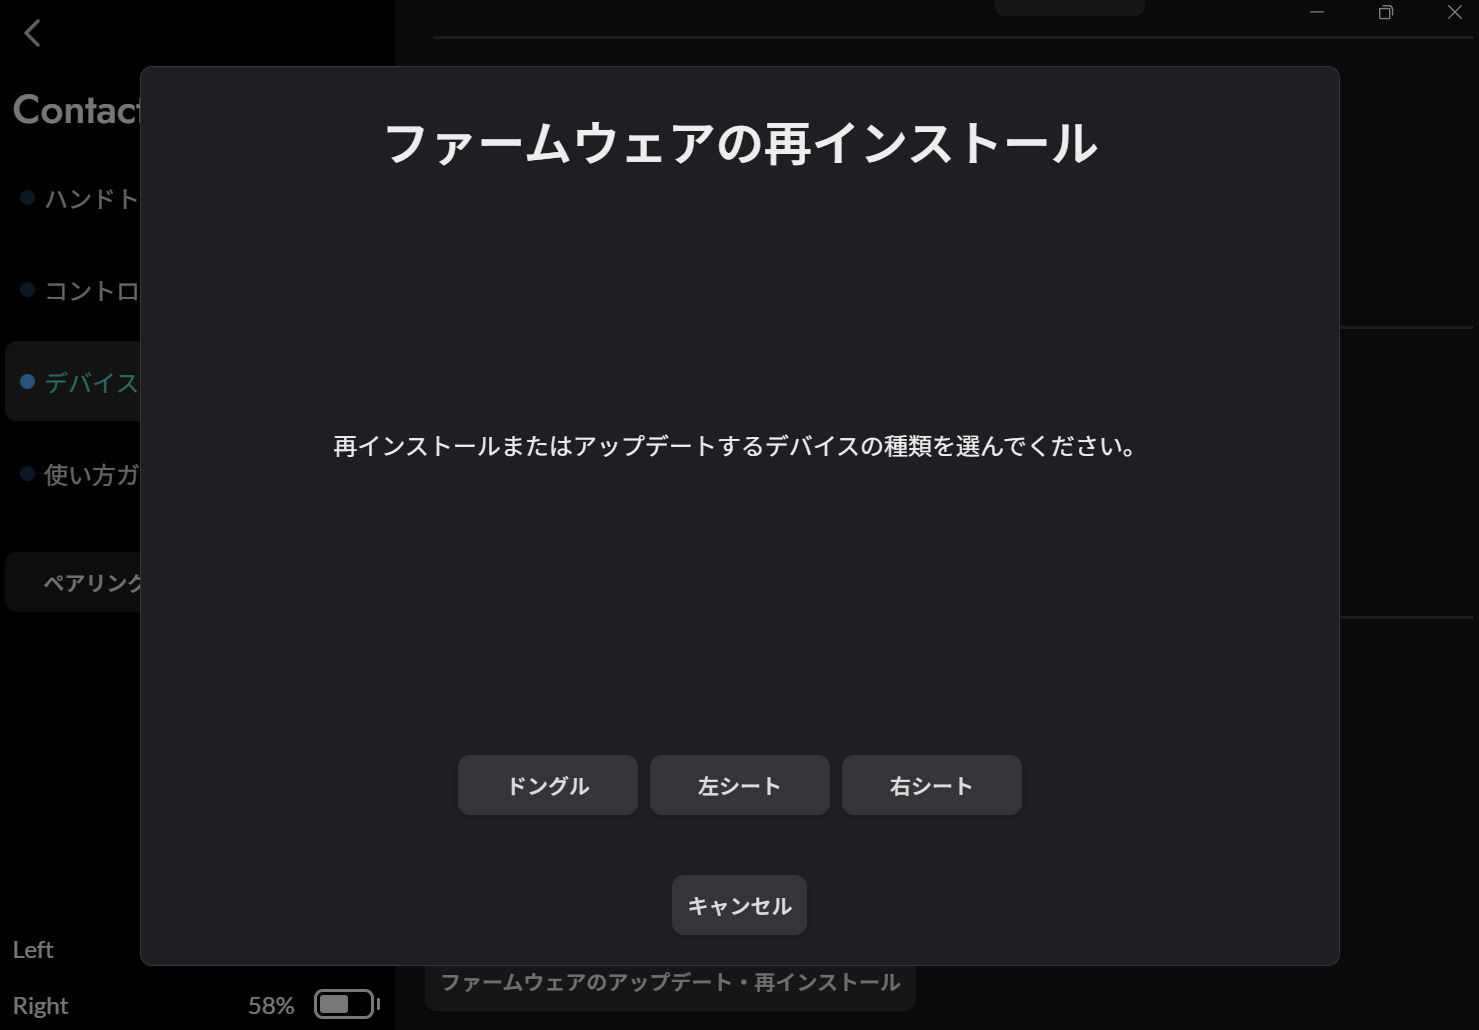
- Perform the Firmware reinstallation for both the left and right sides of the ContactSheet in the same manner.
The initial setup is complete!
# Dongle Connection
- Launch DivingStation and insert the ContactSheet dongle into the PC as instructed on the screen.
- The dongle will be recognized, and the ContactSheet device main screen will be displayed.
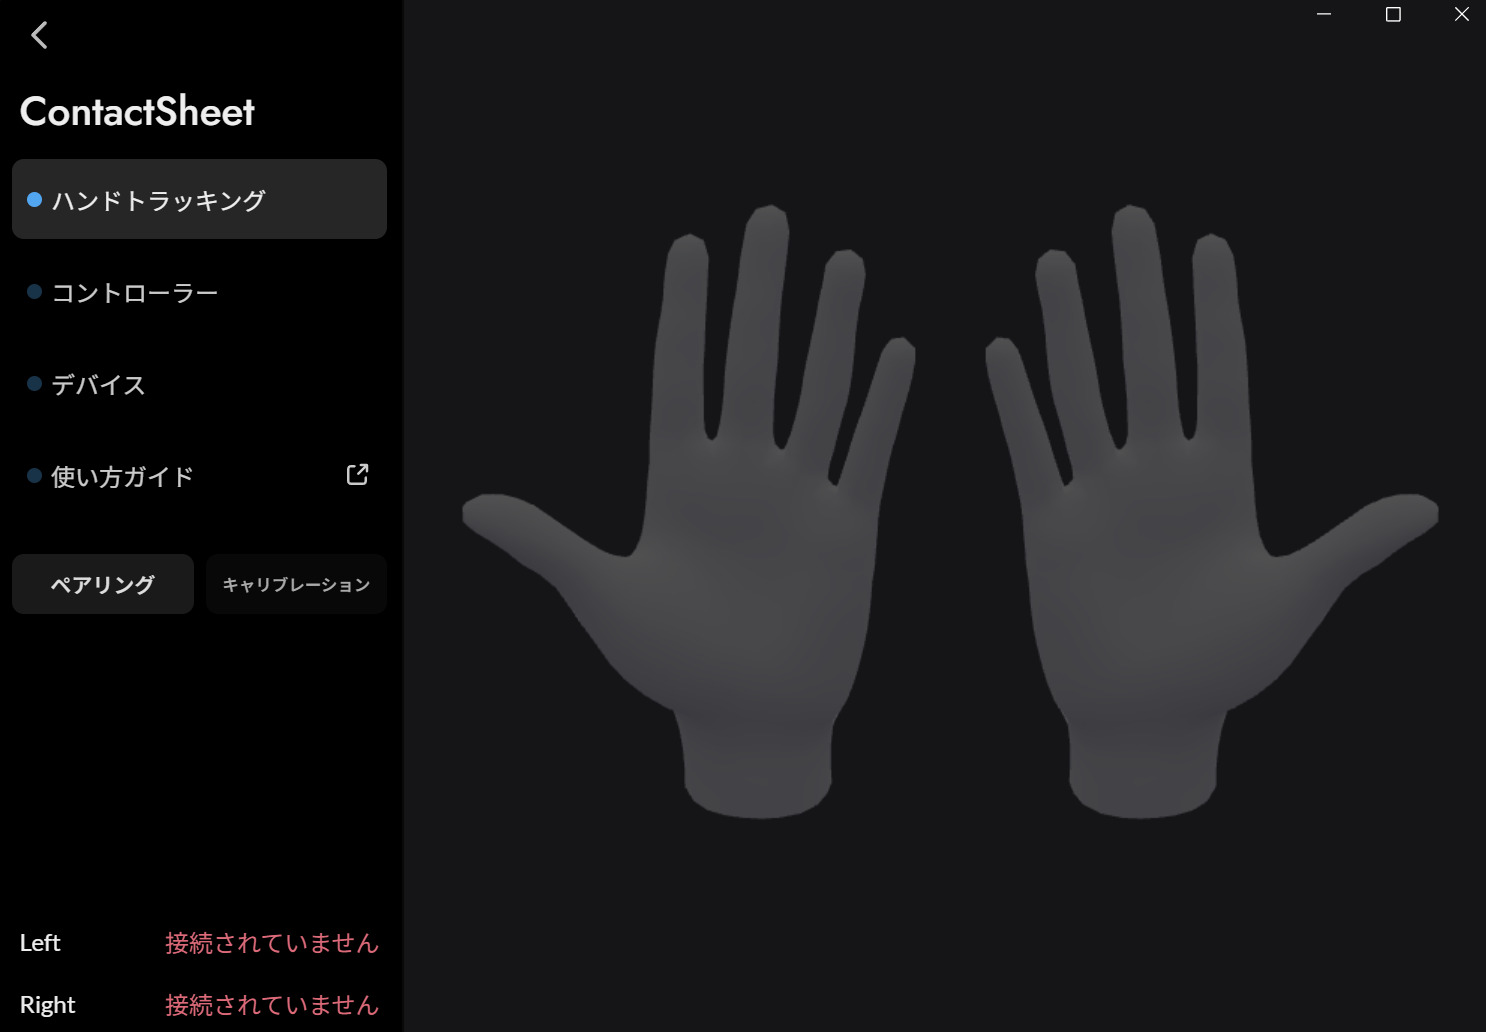
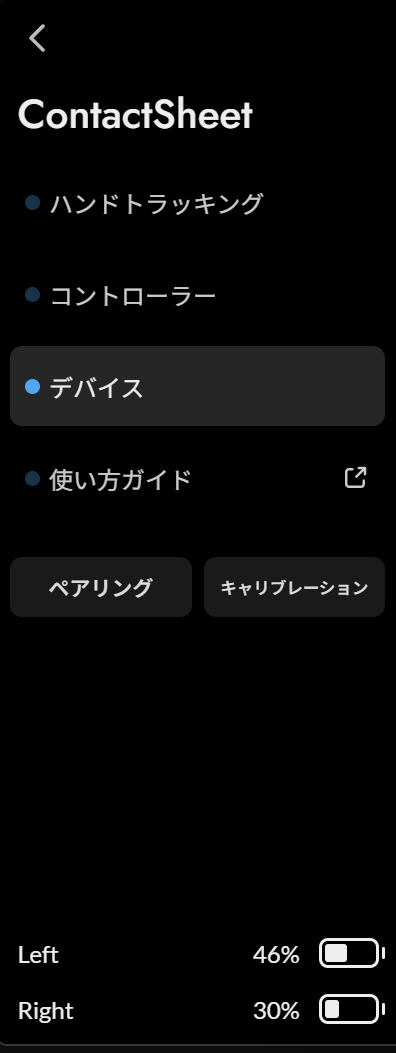
# Pairing
- Press and hold the power button on the ContactSheet device to turn on each power for the left and right sides.
- Once the device is blinking red and powered on, click "Pairing" at the bottom of the tab menu.
- Follow the on-screen instructions to press and hold the pairing button on the ContactSheet device.
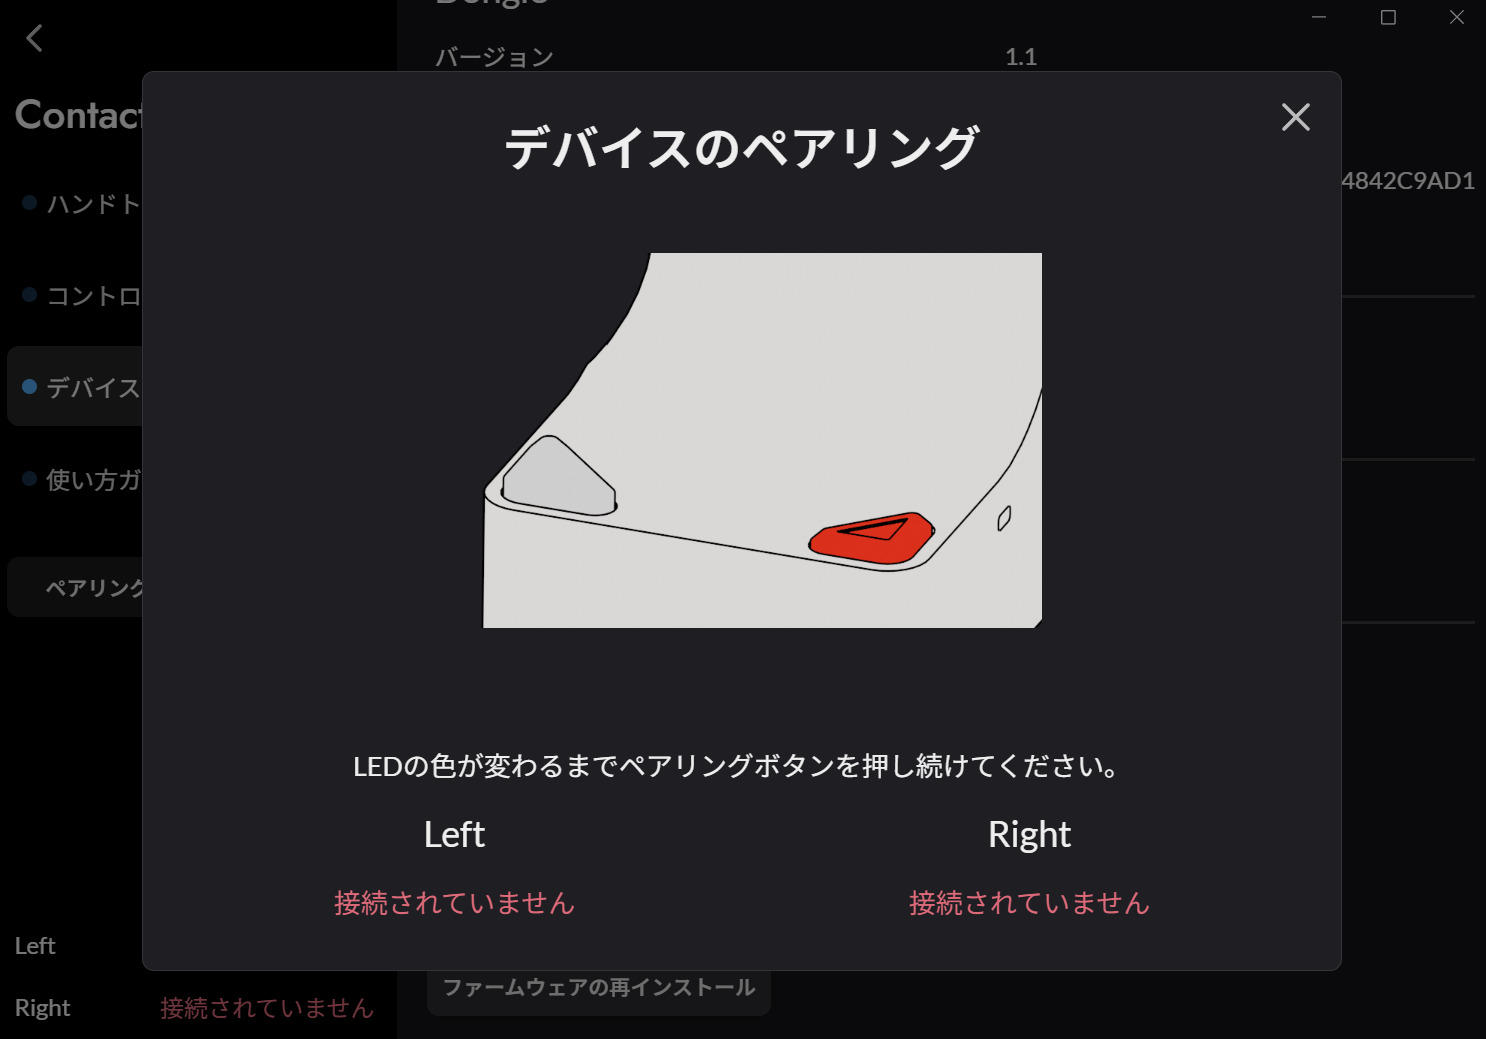
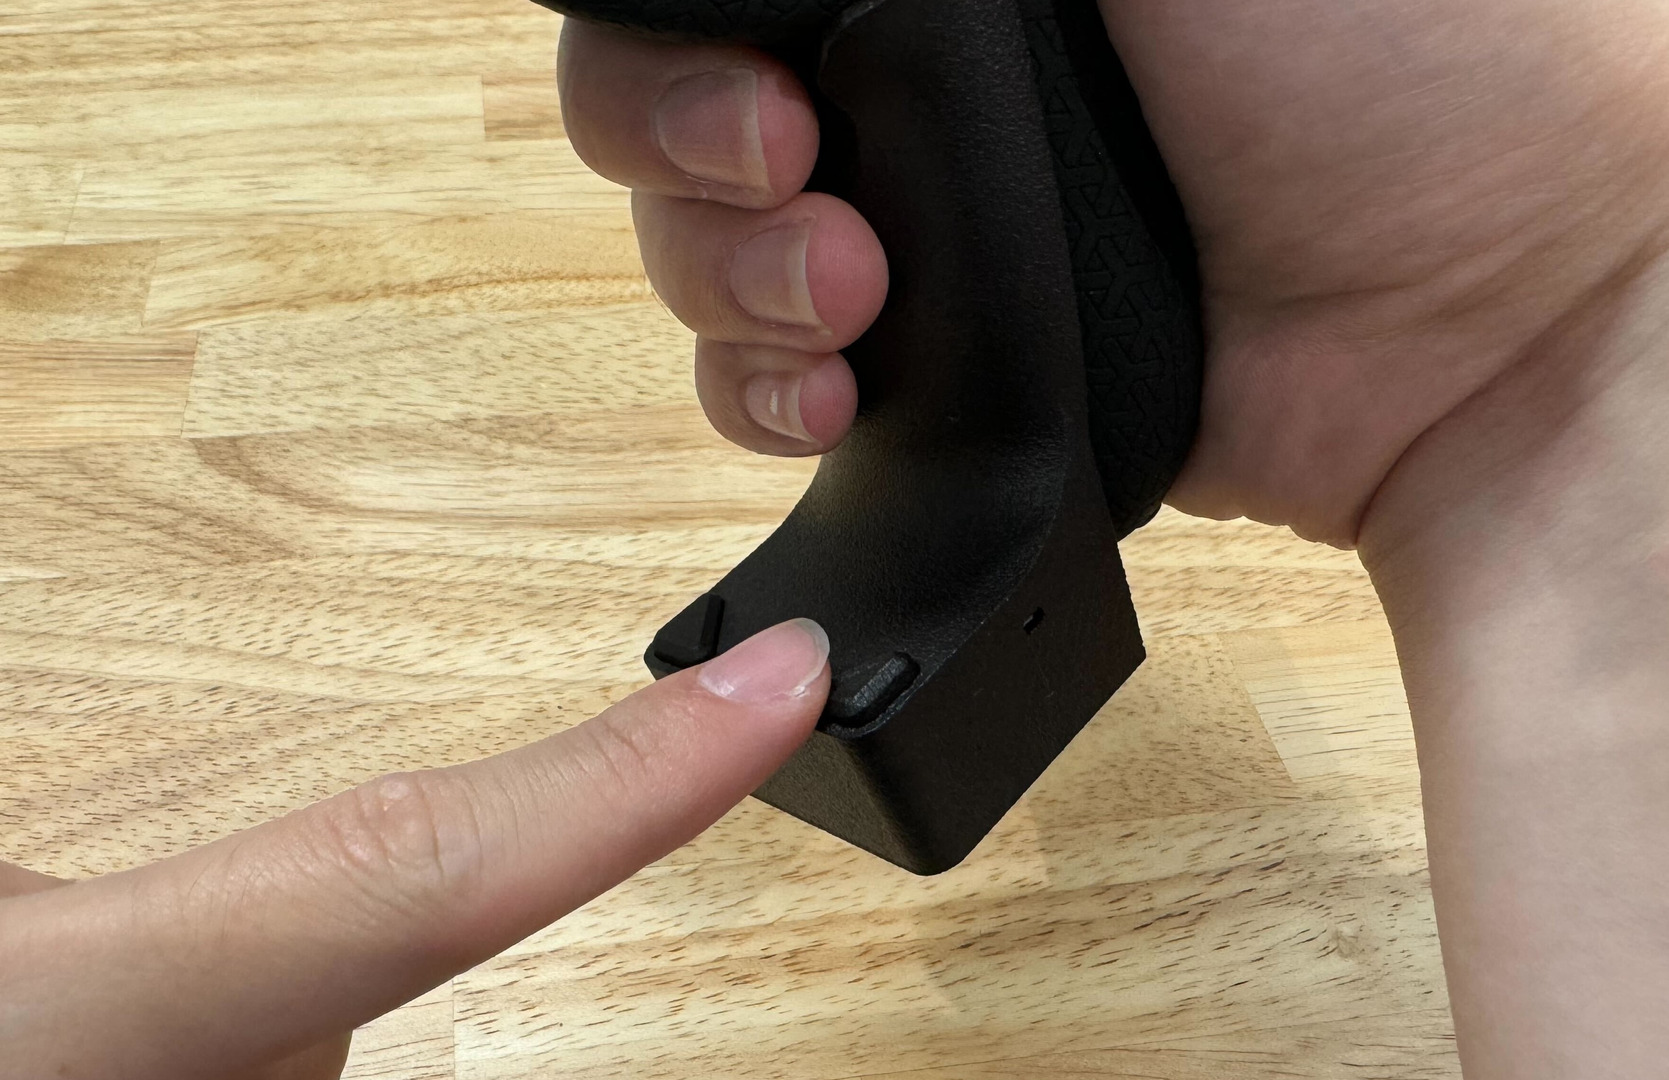
- The ContactSheet device lamp will blink yellow during pairing, and once pairing is complete, the device will light up green, and the screen will display Connected.
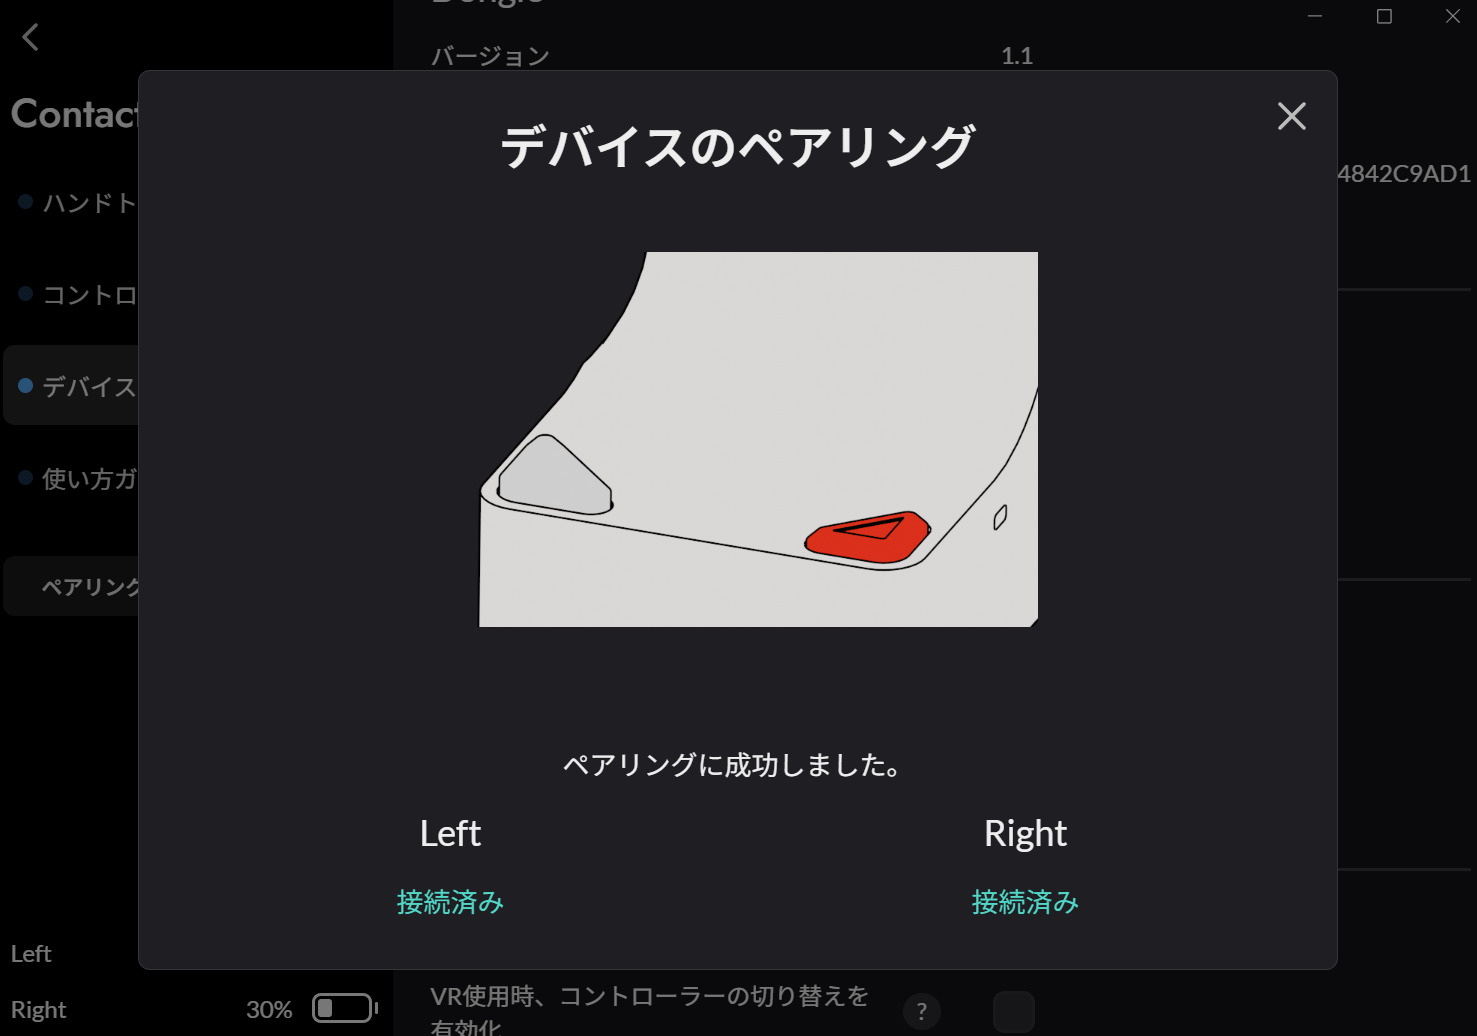
- If the device lamp is green but the screen does not change:
- Close the Device Pairing screen and wait for a while for the connection status to be updated.
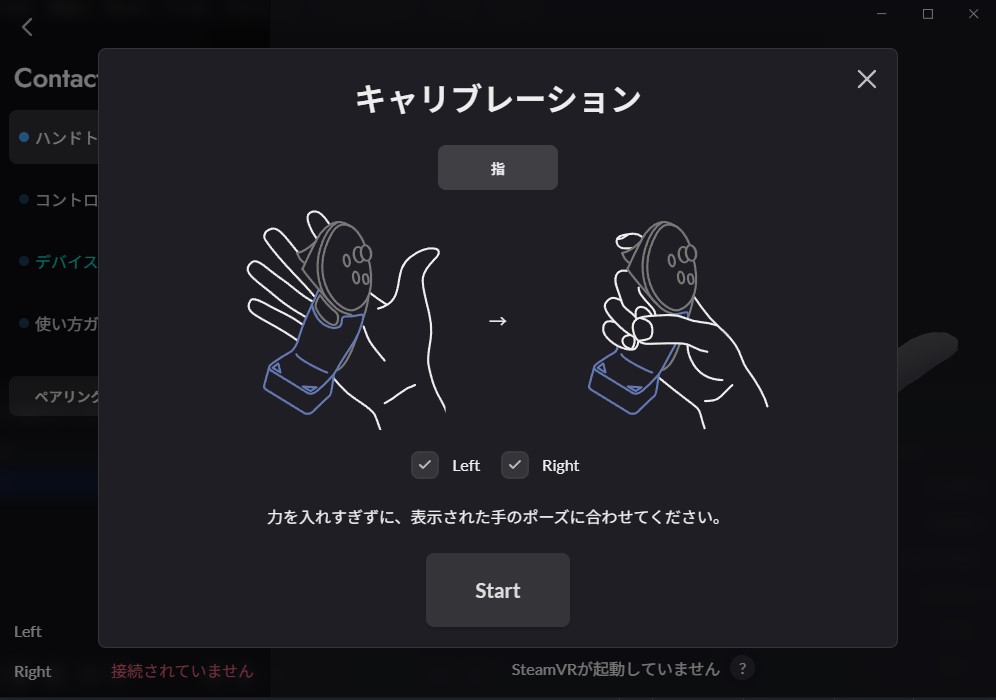
# Calibration
- Click "Calibration" at the bottom of the tab menu.
TIP
You can also open the calibration screen by pressing the spacebar.
- Select the hand for calibration and press Start.
- Follow the on-screen instructions to grip the controller with the ContactSheet attached and press the Start button to perform calibration.
TIP
Calibration can also be started by pressing the Enter key.
TIP
Be sure to attach the included strap to the controller and perform calibration while wearing it.

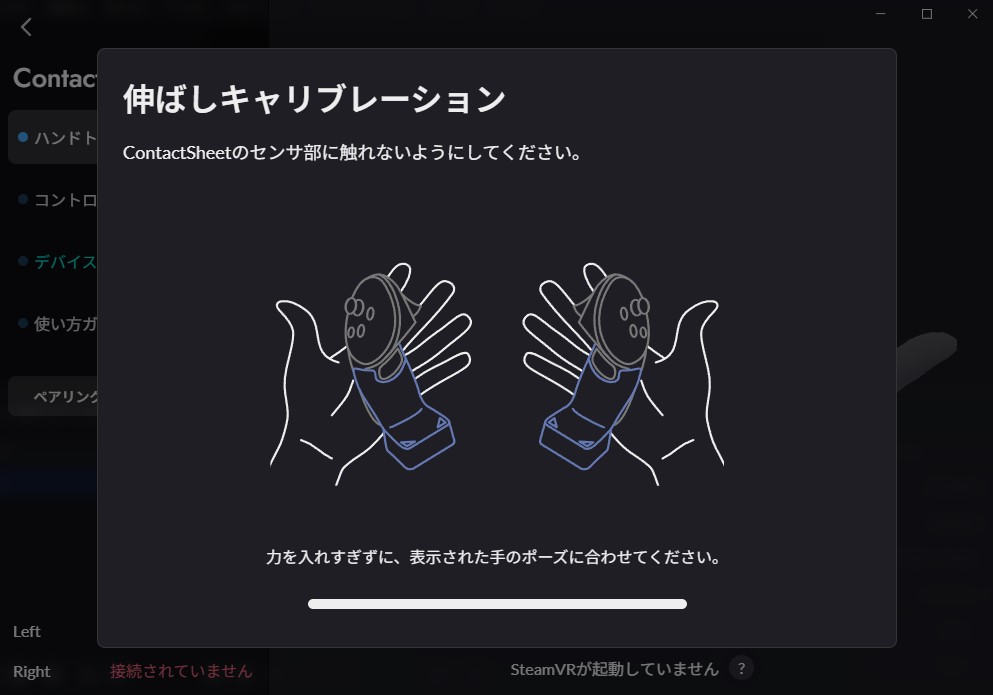
- Perform the stretch calibration.
TIP
Make sure the strap is tightly secured, and stretch your fingers without touching the ContactSheet device.
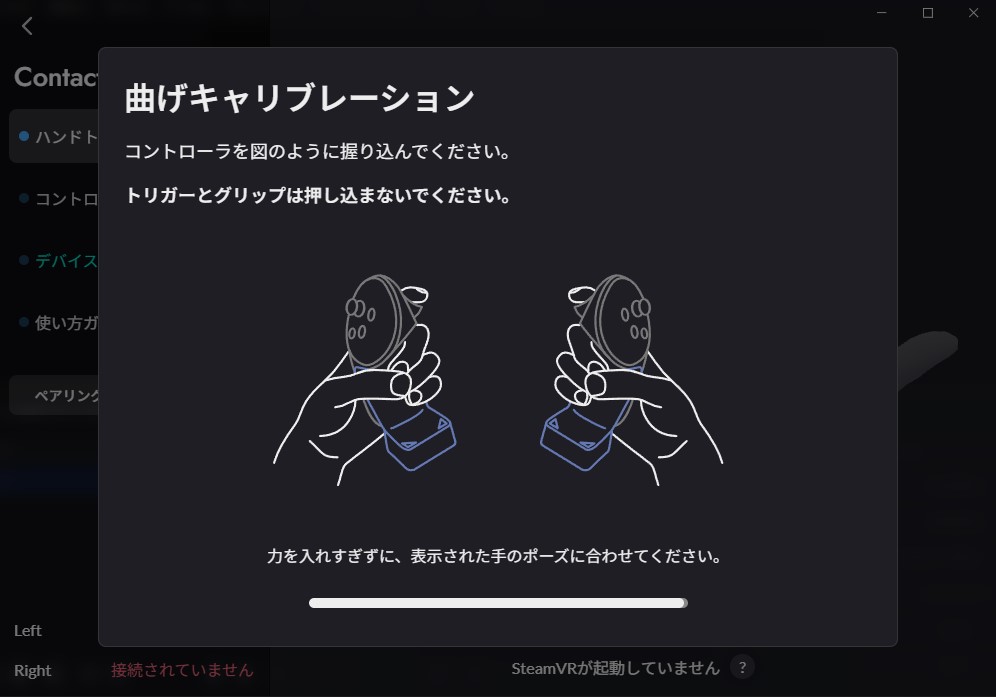
- Perform the bend calibration.
TIP
- Make sure to perform this with the strap tightened securely.
- Do not grip the trigger or grip, and hold the device itself.
- As shown in the image on the screen, grip the thumb with your thumb making a loop with your thumb and middle finger.
- To calibrate neatly, grip with your fingers spaced apart from the middle finger to the little finger.
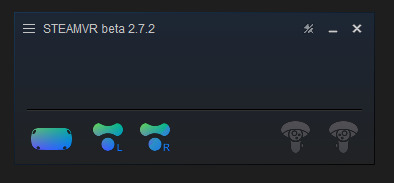
# SteamVR Related Settings
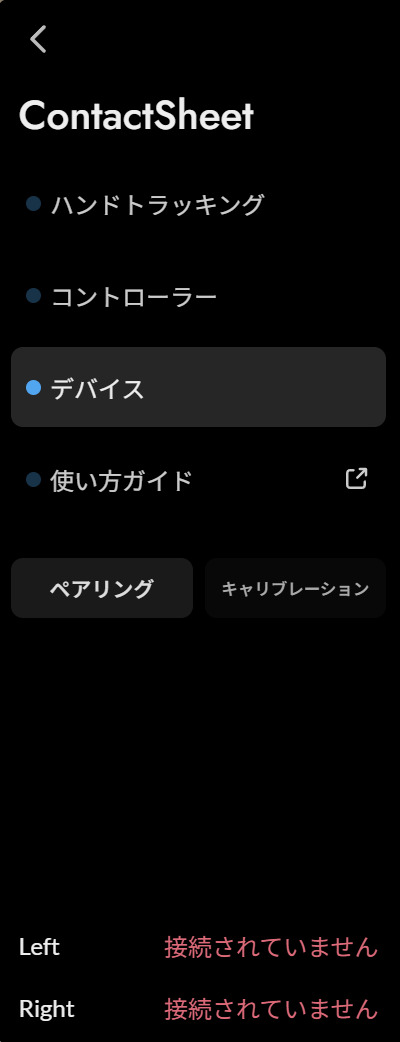
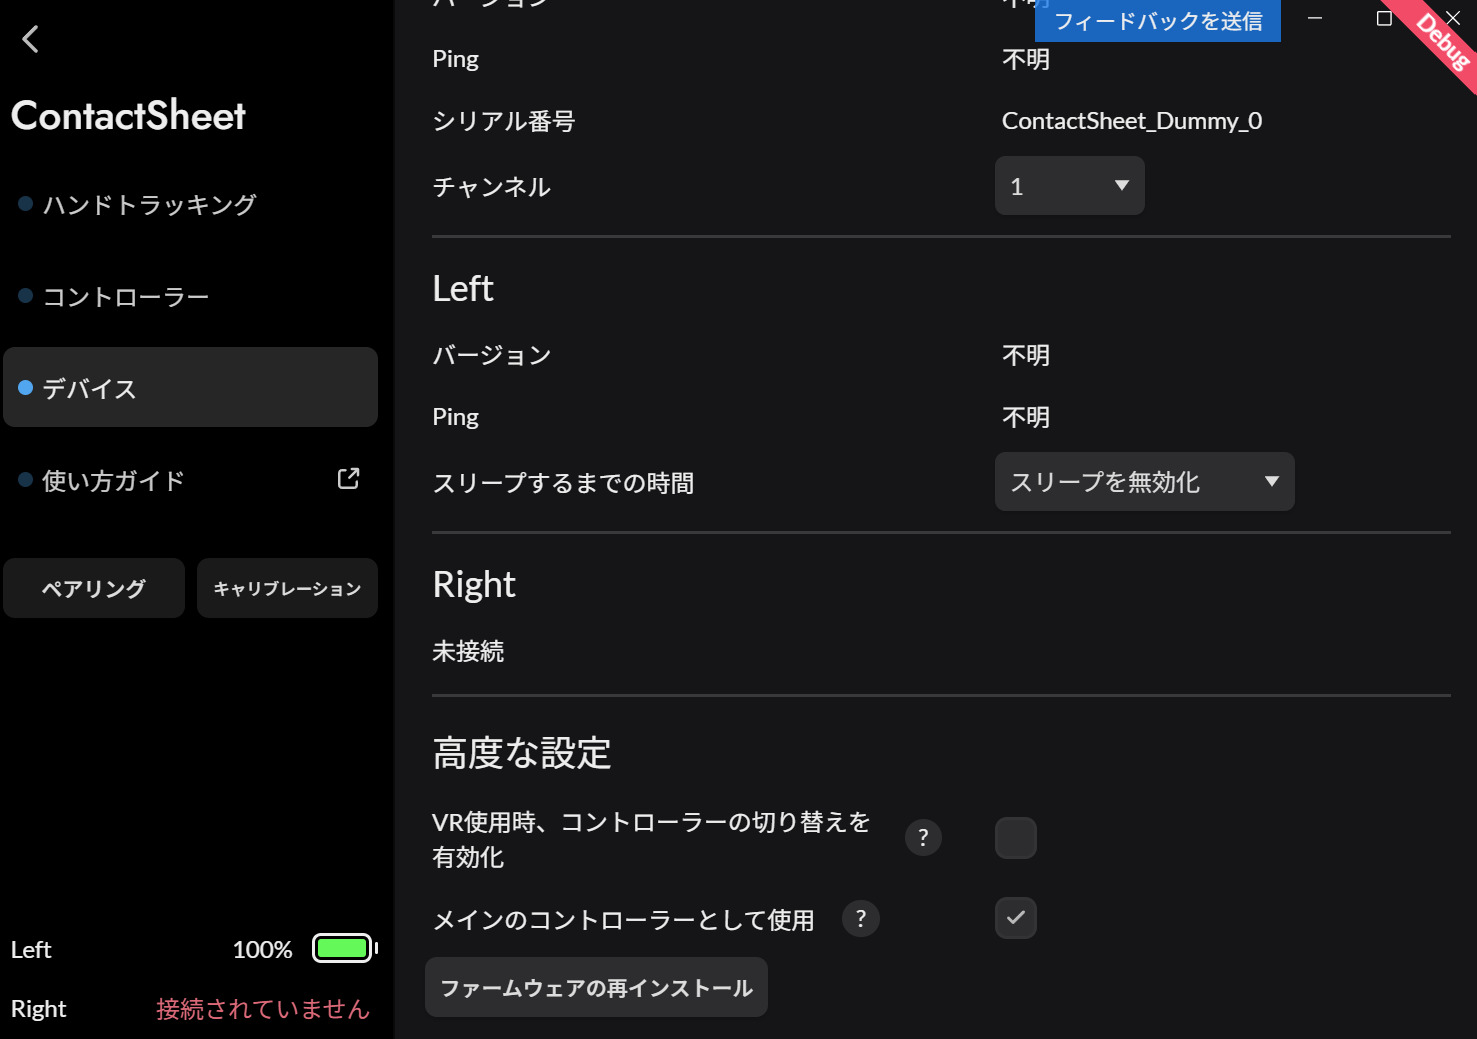
Check that the settings in ContactSheet's main screen, left tab menu > Devices > Advanced Settings, match the image.
Click the "<" at the top left of the ContactSheet main screen to move to the device selection screen.
- Click the gear icon at the top right of the device selection screen.
Confirmation
Ensure that the SteamVR driver installation item is marked as Uninstall (meaning it is already installed).
- Start SteamVR using various PCVR streaming software.
About VirtualDesktop
- Check Streaming > Advanced Options > Track controllers.
- If unchecked, the Controller will not be recognized.
- Experimental support is provided for VirtualDesktop's Index controller emulation feature; however, it is recommended to use it with Streaming > Advanced Options > Forward tracking data to PC > Emulate Index Controllers unchecked.
- To change the bindings for each SteamVR application when enabling VirtualDesktop's Index controller emulation feature, follow these steps:
- Turn ON Emulate Index Controllers
- Display the SteamVR settings > Controllers > Bindings settings UI
- Select the application in the Bindings settings UI
- Confirm that the current controller is an Index controller
- Change the application bindings
- To change the bindings for each SteamVR application when enabling VirtualDesktop's Index controller emulation feature, follow these steps:
- Confirm that the Diver-X logo is lit up in blue in the SteamVR status window, and the Quest controllers with ContactSheet are off.
- In SteamVR, it will be recognized as a Valve Index controller.
- Fine adjustment of controller position will be implemented in the future.
If SteamVR crashes when turning on the ContactSheet add-on
Please try installing the latest Microsoft Visual C++ Redistributable Package from this page (external link) (opens new window) as it may resolve the crash.
- Verify that controller input and hand tracking are working in various SteamVR content.
Regarding Controller Input
While the appearance in SteamVR is that of an Index controller, controller input adheres to Quest2/3/Pro controller standards. Specifically:
SteamVR Trigger and Grip Input
- Input detection occurs only when pressing the Trigger/Grip buttons on the Quest2/3/Pro controllers
- Holding only the ContactSheet itself will not register Trigger and Grip inputs
SteamVR ThumbPad Input
Using the touchpad (thumbrest) of the Quest controller and the thumb sensor of the ContactSheet,you can input trackpad touches and pressure.
- When touching the touchpad: Touch=ON, Pressure=0
- When touching the thumb sensor of the ContactSheet: Touch=ON, Pressure=1
Regarding Gestures in VRChat
- Various Gestures and Input Specifications
- (Excluding the thumb) ContactSheet sensor: Bending from the index finger to the middle of the little finger
- Quest2/3/Pro controller's Trigger: Bending from the middle of the index finger to a full grip
- Quest2/3/Pro controller's Grip: Bending from the middle of the middle finger to a full grip
- Quest2/3/Pro controller's A/B/Joystick touch sensors: Thumb bending
- (For Fist) GestureWeight value: Controlled by the Trigger amount on the Quest2/3/Pro controller
Regarding Switching Between ContactSheet + Quest2/3/Pro Controller ⇔ Quest2/3/Pro Controller Alone
DivingStation ContactSheet Main Screen > Tab Menu > Devices > Advanced Settings > Use as main controller
- Even if the above check is removed, it will not be recognized as a Quest2/3/Pro controller alone, and the controller will be disabled.
In DivingStation, switch the SteamVR driver installation item in step 13 to Install, and disable the driver
In DivingStation, you can enable the switch between ContactSheet and Quest2/3/Pro controller alone based on the connection status of the ContactSheet by checking "Enable controller switching when using VR" from Devices > Advanced Settings.